

Best Footwear for Blister-Free Hiking
Your Hike Shouldn't End in Pain
Blisters are the most common hiking ailment, and they can ruin a perfect day on the trail. They are not a sign of weakness; they are a sign of friction. The right footwear doesn't just protect you from rocks—it protects you from your own skin.
Preventing blisters is a system, not a single product. It starts with choosing the right shoes and building a strategy around them.
The Blister Equation: Heat + Moisture + Friction
Blisters form when repeated friction creates a shear force between your skin and your sock, or your sock and your shoe. This friction generates heat and moisture, softening the skin and making it tear more easily. Your goal is to break this equation by managing all three factors.
Step 1: Choose the Right Shoe or Boot
The foundation of blister prevention is a properly fitting shoe. The "best" model is the one that fits your foot.
- Fit is Everything: A hiking shoe should feel snug in the heel and midfoot to prevent lifting, with plenty of room in the toe box. Your toes should never touch the front of the shoe, especially when going downhill.
- Shop in the Afternoon: Feet swell throughout the day. Always try on shoes in the afternoon or evening when your feet are at their largest.
- Wear Your Hiking Socks: Bring the socks you plan to hike in to try on with the shoes.
- Test on an Incline: Most outdoor stores have a small ramp. Walk up and down it to ensure your toes don't jam into the front.
Types of Footwear:
- Trail Runners: Lightweight, flexible, and quick-drying. Ideal for day hiking on well-maintained trails with a light pack. Generally more breathable.
- Hiking Shoes: Offer more ankle support and protection than trail runners but are lighter and less stiff than boots. A versatile choice for most day hikers.
- Hiking Boots: Provide maximum ankle support, protection, and durability. Essential for carrying heavy packs, navigating rough, rocky terrain, or for hikers who need extra ankle stability.
Step 2: The Sock System: Your First Layer of Defense
The wrong socks can cause blisters in the perfect shoes. The right socks can prevent them in less-than-ideal ones.
Material is Critical: Avoid Cotton.
-
- Cotton is a terrible choice. It absorbs moisture and holds it next to your skin, creating the perfect environment for blisters.
- Merino Wool is the gold standard. It wicks moisture away from the skin, regulates temperature, and retains its cushioning even when wet. It is also naturally odor-resistant.
- Synthetic Blends (polyester, nylon) are also excellent. They are durable, wick moisture effectively, and dry quickly.
Consider a Liner System:
-
- For long distances or those prone to blisters, a two-sock system is highly effective.
- Liner Sock: A thin, tight-fitting synthetic sock (e.g., polyester). Its job is to wick moisture away from the skin and manage friction between your foot and the outer sock.
- Outer Sock: A thicker cushioning sock, usually merino wool or a blend. Its job is to provide padding and absorb the friction from the shoe.
Step 3: The Pre-Hike Preparation
Preparation begins before you take a single step on the trail.
- Break Them In: Never wear new footwear on a significant hike. Wear them around the house, then on short walks, to gradually soften the materials and mould them to your feet.
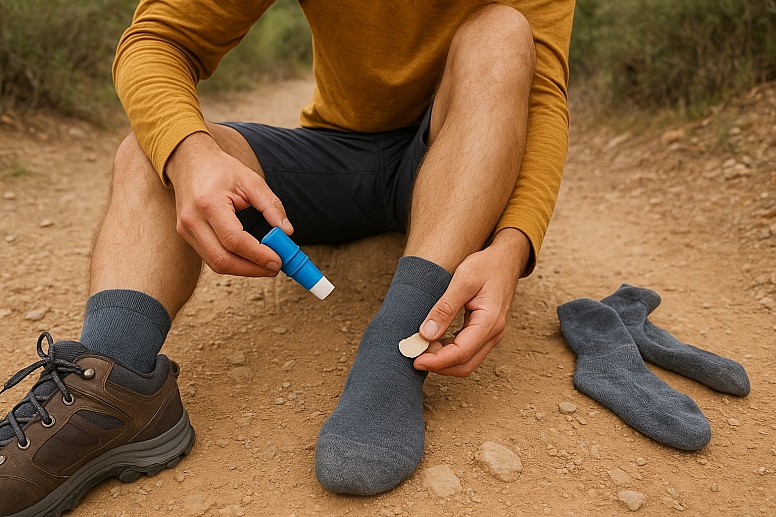
- Pre-Tape Problem Areas: If you know you are prone to blisters in specific spots (heels, balls of feet), pre-apply a durable tape like Leukotape P. It sticks for days, even when wet, and creates an ultra-smooth surface that reduces friction.
- Keep Toenails Trimmed: Long or rough toenails can puncture adjacent toes or put pressure on the nail bed, leading to painful subungual blisters or black toenails.
Step 4: On-The-Trail Management
Stay proactive during your hike.
- Stop at the First Sign of Trouble: The moment you feel a "hot spot" (a warm, tender area), stop immediately. Do not wait until it becomes a full blister.
- Reduce Friction: Apply a lubricant (like Bodyglide) or a specialized blister prevention patch directly to the hot spot. Covering it with a piece of moleskin or duct tape can also work in a pinch.
- Change Socks: On long hikes or in wet conditions, changing into a fresh, dry pair of socks at the halfway point can feel revolutionary and reset your blister prevention.
The Final Fitting
The perfect hiking shoe is the one you don't notice. It becomes a part of you, allowing you to focus on the trail, not your feet. It’s an investment in comfort that pays dividends with every step you take.
Don't just break in your shoes. Break in a blister-free strategy.
Frequently Asked Questions
Are waterproof boots better for preventing blisters? Not necessarily. While they keep water out, they also tend to trap sweat and moisture in, which can increase blister risk. For dry climates or fast-paced hiking, non-waterproof (breathable) shoes paired with merino wool socks are often a better choice for managing moisture.
How should hiking shoes fit compared to regular shoes? You typically need a half to a full size larger than your everyday shoes. This allows for foot swelling during long hikes and prevents your toes from hitting the front on descents. The width is also crucial; your foot should not feel squeezed.
What is the single best thing I can do to prevent blisters? Wear merino wool or synthetic socks and ensure your shoes fit perfectly. These two factors address the core elements of friction and moisture management.
How do I treat a blister if I get one on the trail? If it's small and not painful, leave it intact; the skin is a natural bandage. If it's large and painful, drain it: clean a needle with an alcohol wipe, prick the edge of the blister, gently press out the fluid, and cover it with a blister-specific bandage. Do not remove the overlying skin.
LEAVE A COMMENT
Categories
Recent Posts
")


")


0.0265